

How do I design my first electronic circuit board? (PCB)
Beginner electronics and PCB design made simple: describe your first circuit board in plain English and siliXon picks the parts, places, routes and checks it. siliXon provides the easiest way to design circuits for anyone regardless of experience.
What's the best way to design your first PCB? Your first printed circuit board (PCB) used to take weeks of learning before you could order anything. You had to draw a schematic, find parts, match every part to its footprint, place them by hand, route every copper trace, then fix a long list of errors.
With siliXon, you describe the board you want in plain English. siliXon picks real parts, places them, routes the copper, checks the design and prepares the files for the manufacturer. You go from an idea to a board you can order just by prompting.
This guide walks through that journey for someone who has never designed a PCB, with screenshots of each step.
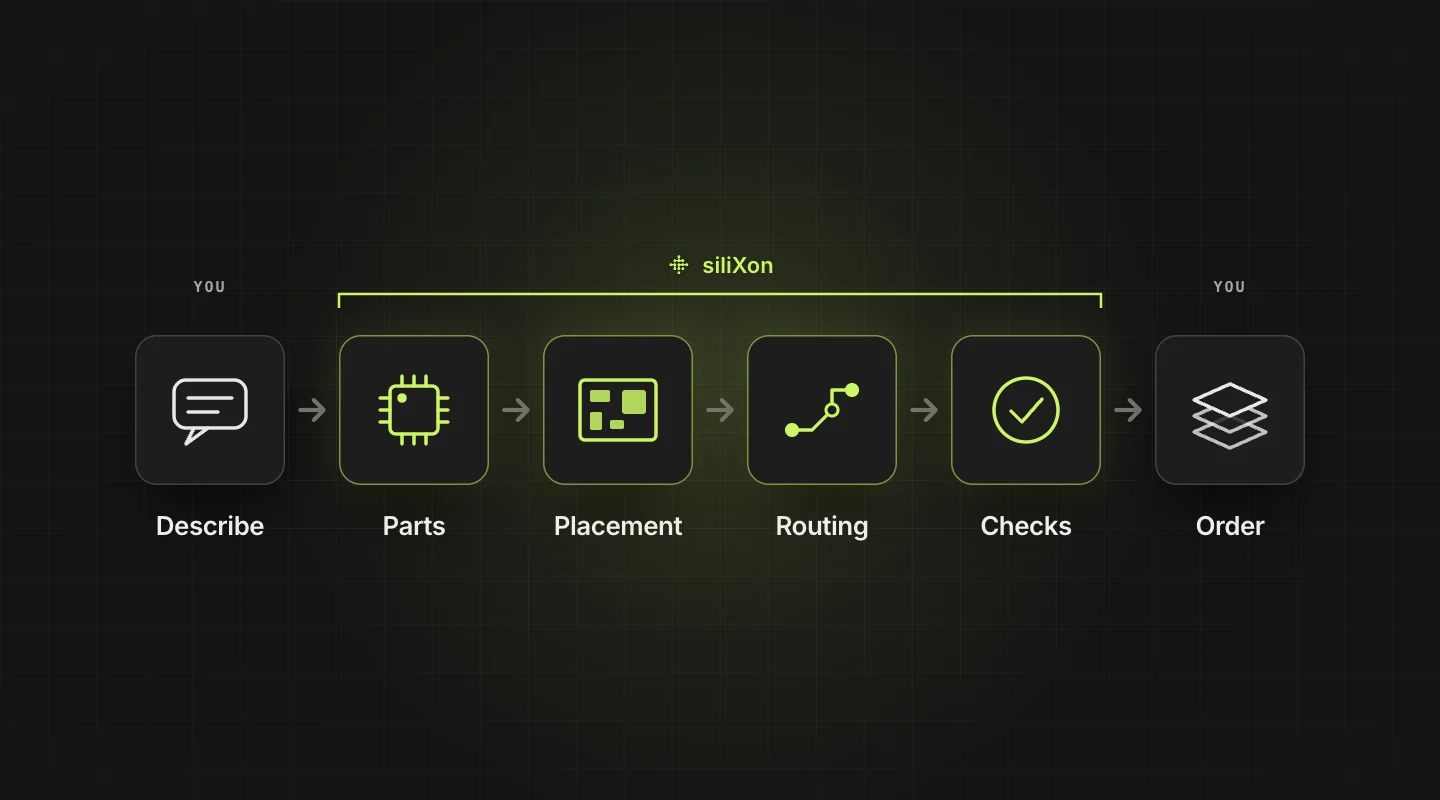
You do the first and last steps. siliXon does everything in between.
The short answer
The easiest way to design your first PCB as a beginner is to:
- Start with a small idea, such as an LED that lights up from a coin-cell battery.
- Describe it to siliXon in plain English. siliXon chooses the parts, places them on the board, routes the copper and runs the design checks for you.
- Send it to a manufacturer. siliXon prepares the manufacturing files, so all that's left is placing the order.
No schematic to draw, no parts to place by hand, no traces to route. All you need is a browser.
What is a PCB?
A PCB (or a printed circuit board) is the flat (usually green) board inside almost every electronic device. It holds the components (chips, resistors, LEDs, connectors) and connects these components together with thin copper wires, meaning PCBs are the most efficient & functional way to design circuits. They replaced the hand-wired circuits of early radios, as our brief history of PCBs explains.
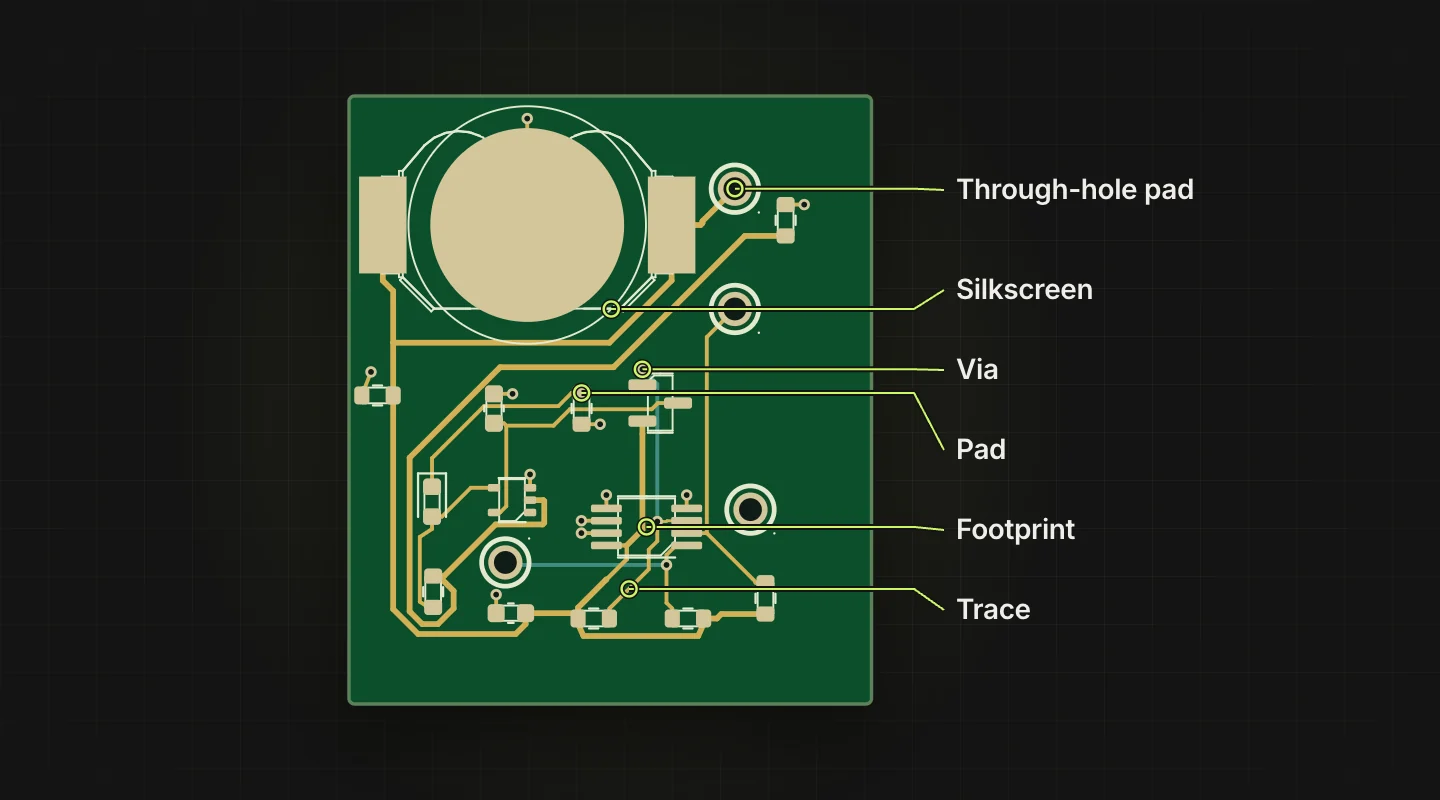
A small temperature indicator designed with siliXon, with the parts of a PCB labelled.
Designing one by hand takes four jobs, which KiCad's Getting Started guide walks through step by step:
- The circuit: deciding which pins connect to which.
- Parts and footprints: choosing real parts you can buy, and the exact copper pads each one is soldered to.
- Placement and routing: positioning every part on the board, then drawing the copper traces between them.
- Manufacturing files: exporting the files a factory builds your board from.
siliXon does all four from your description.
Beginner electronics: what you need to know
Less than you think. siliXon handles the engineering, but a few ideas help you describe what you want and understand what you get back:
- Voltage (V) is the push. A coin cell gives about 3 V, USB gives 5 V, and many chips run at 3.3 V.
- Current (A) is the flow. Small boards usually work in milliamps (mA).
- Resistance (Ω) limits the flow.
- Ohm's law ties them together: V = I × R.
- Polarity matters. Batteries, LEDs and some capacitors only work one way round.
Our design asistant, Rocky, teaches you as you go. Rocky explains why certain components are used, what they are, and what is connected to it. Not only can you design circuit boards in a few minutes, but you learn continuously with using Rocky.
Your first PCB with siliXon, step by step
Our example is the classic first project: an LED that lights up when you insert a coin cell.
1. Describe the board
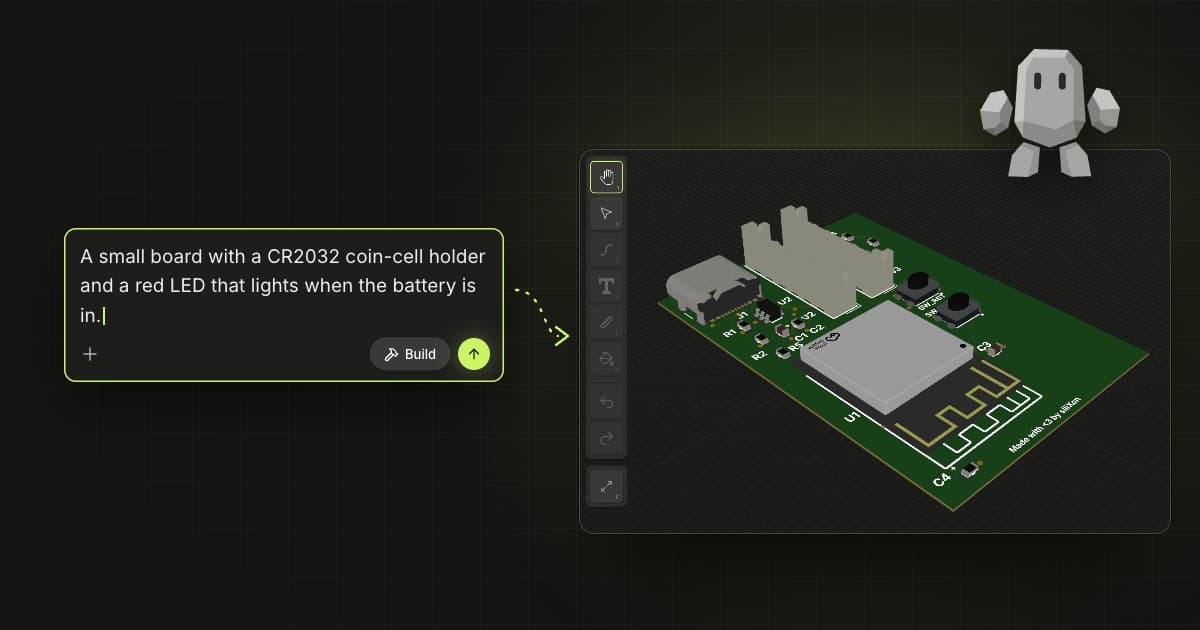
Open siliXon and type what you want, the way you'd explain it to a friend:
Design a small board with a coin cell battery and a red LED that lights when the battery is in.
You don't need part numbers, pin names or measurements.
A real session: one sentence in, and Rocky starts working out what you need.
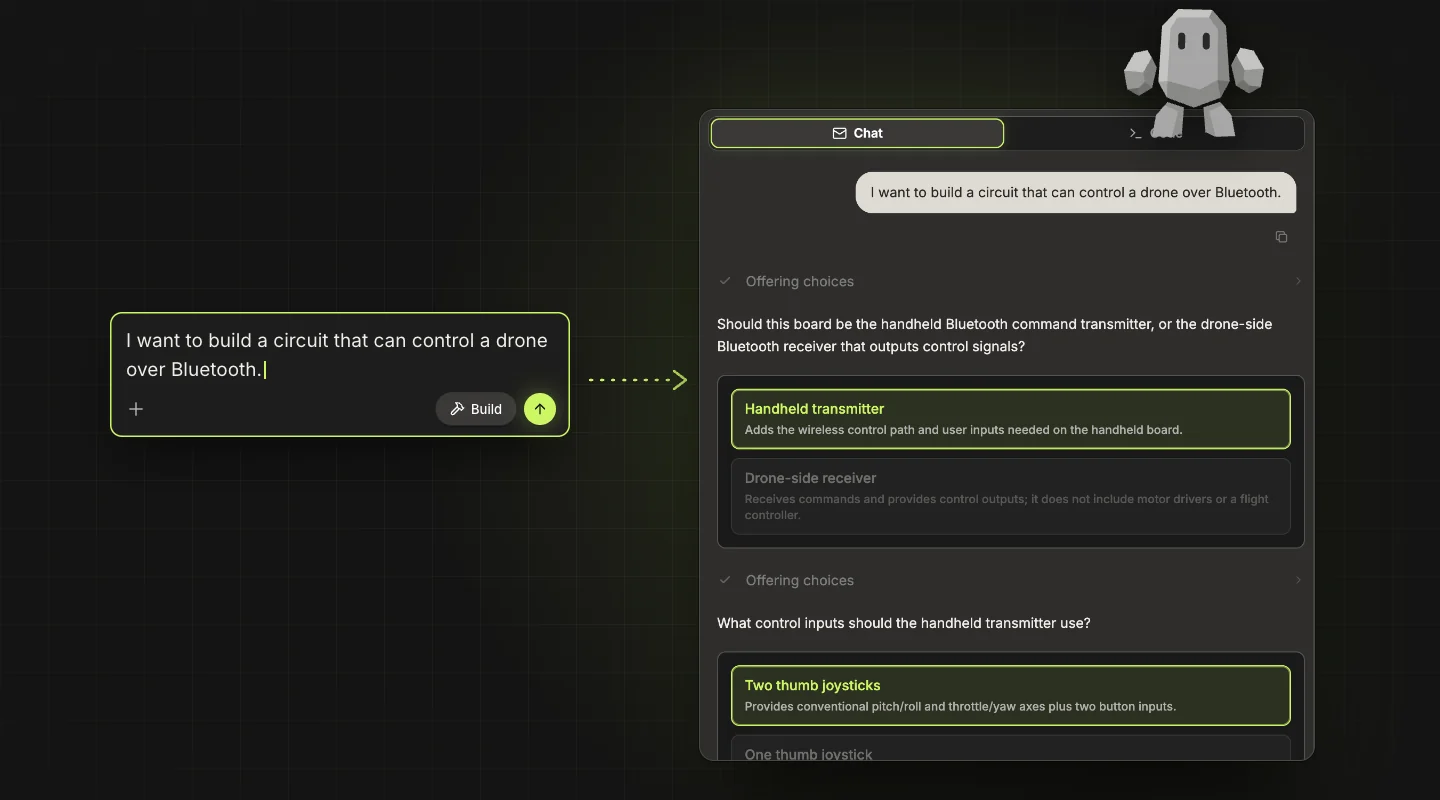
If something important is missing, such as how the board is powered or what it should do, Rocky asks a short question and suggests an answer. You click one and carry on. Or, if you want more precision, you can tell Rocky exactly what you want.
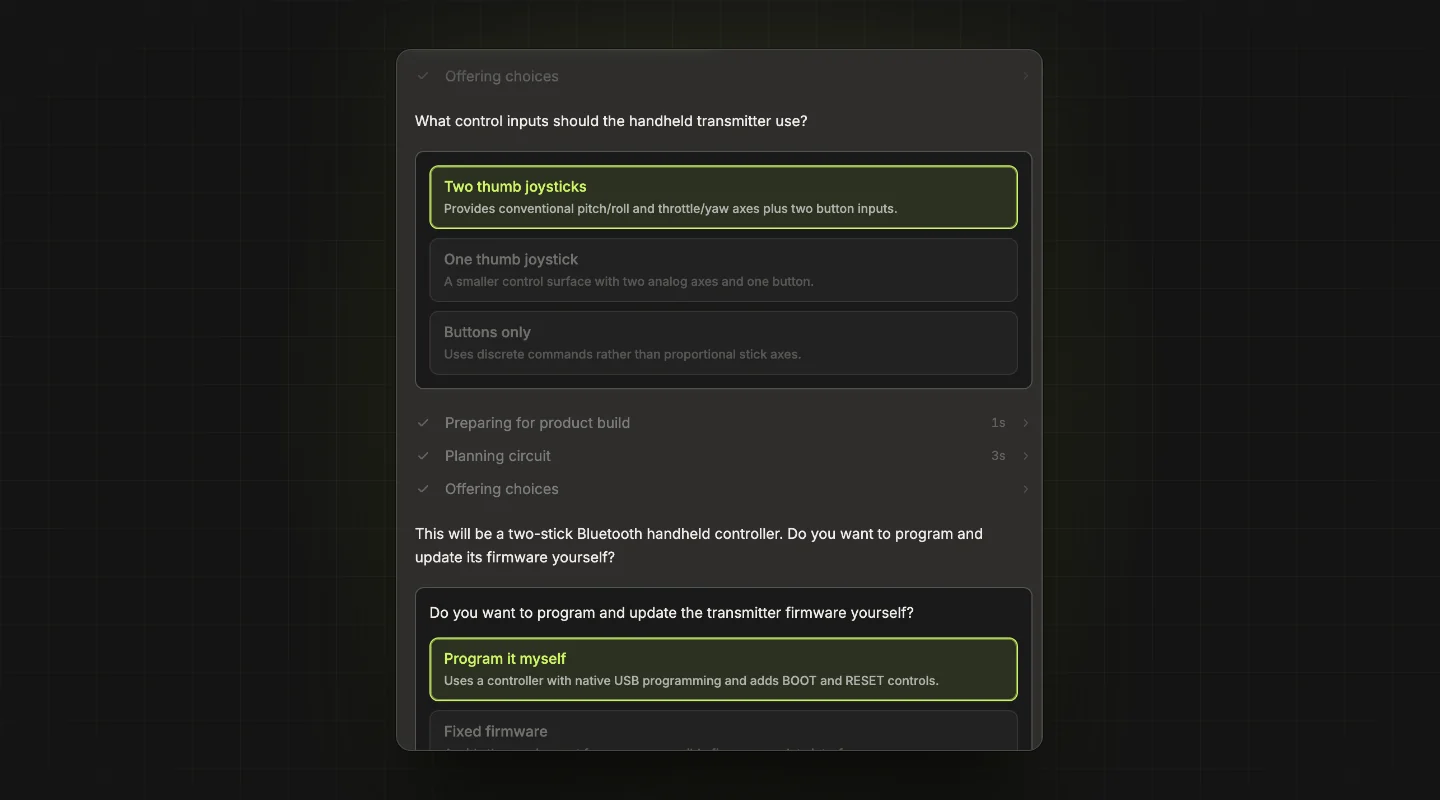
Rocky asks one question at a time, with a recommended answer to click.
2. siliXon designs the circuit and picks the parts
siliXon works out the circuit and the values in it. For the LED board, that means a resistor in series with the LED to limit its current:
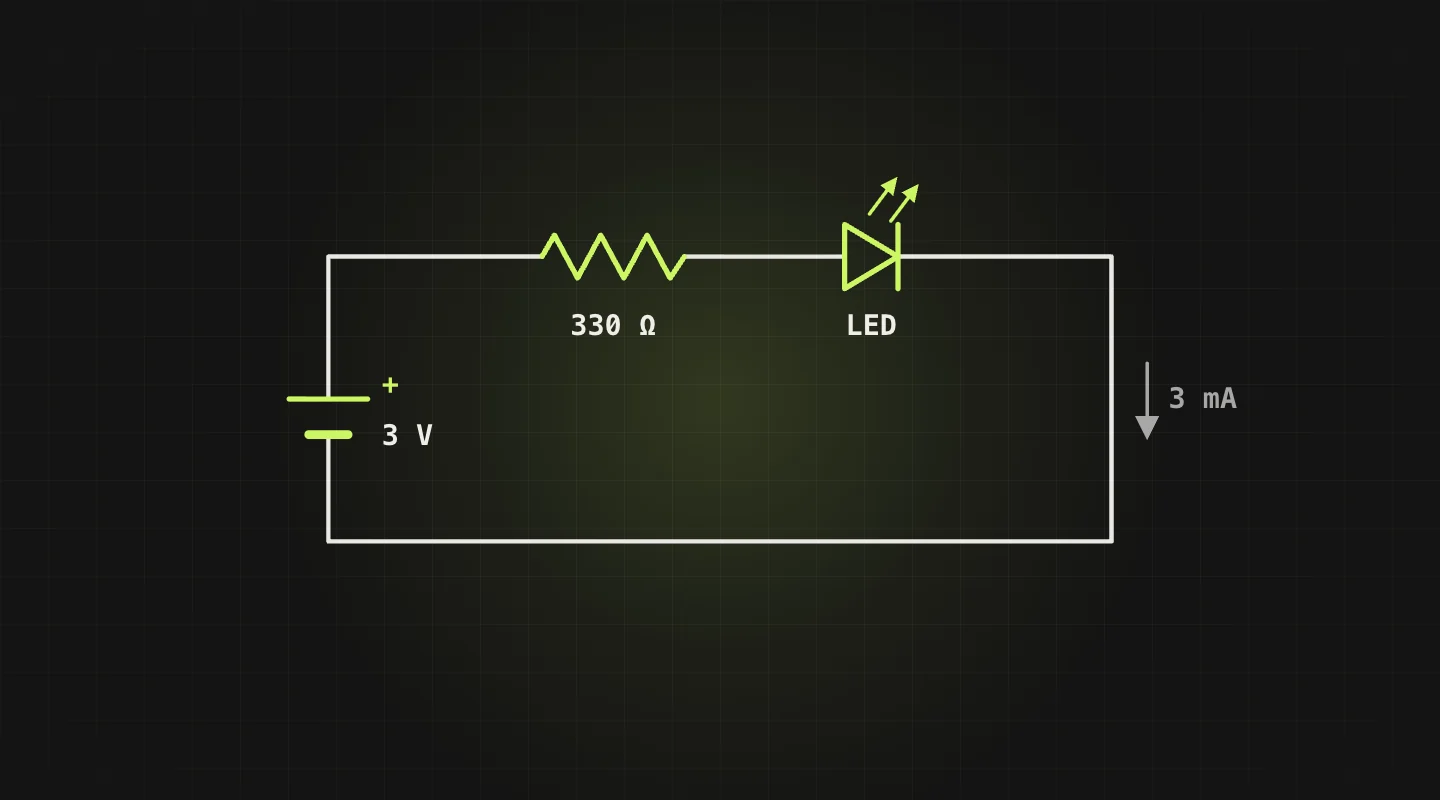
The circuit behind the LED prompt.
A red LED drops about 2 V, so with a 3 V coin cell the resistor takes the remaining 1 V. For a gentle 3 mA, R = 1 V ÷ 0.003 A ≈ 330 Ω. You don't have to do this maths, but it's good to know where the numbers come from, and you can always ask Rocky to explain them. siliXon reads data sheets to figure out the correct passive components to add to ensure the circuit works the first time.
Every part is a real part you can buy, chosen from a catalog of more than 338,000 components, with the footprint that matches it. That removes the most common reason first boards fail: a footprint that doesn't fit the part that arrives.
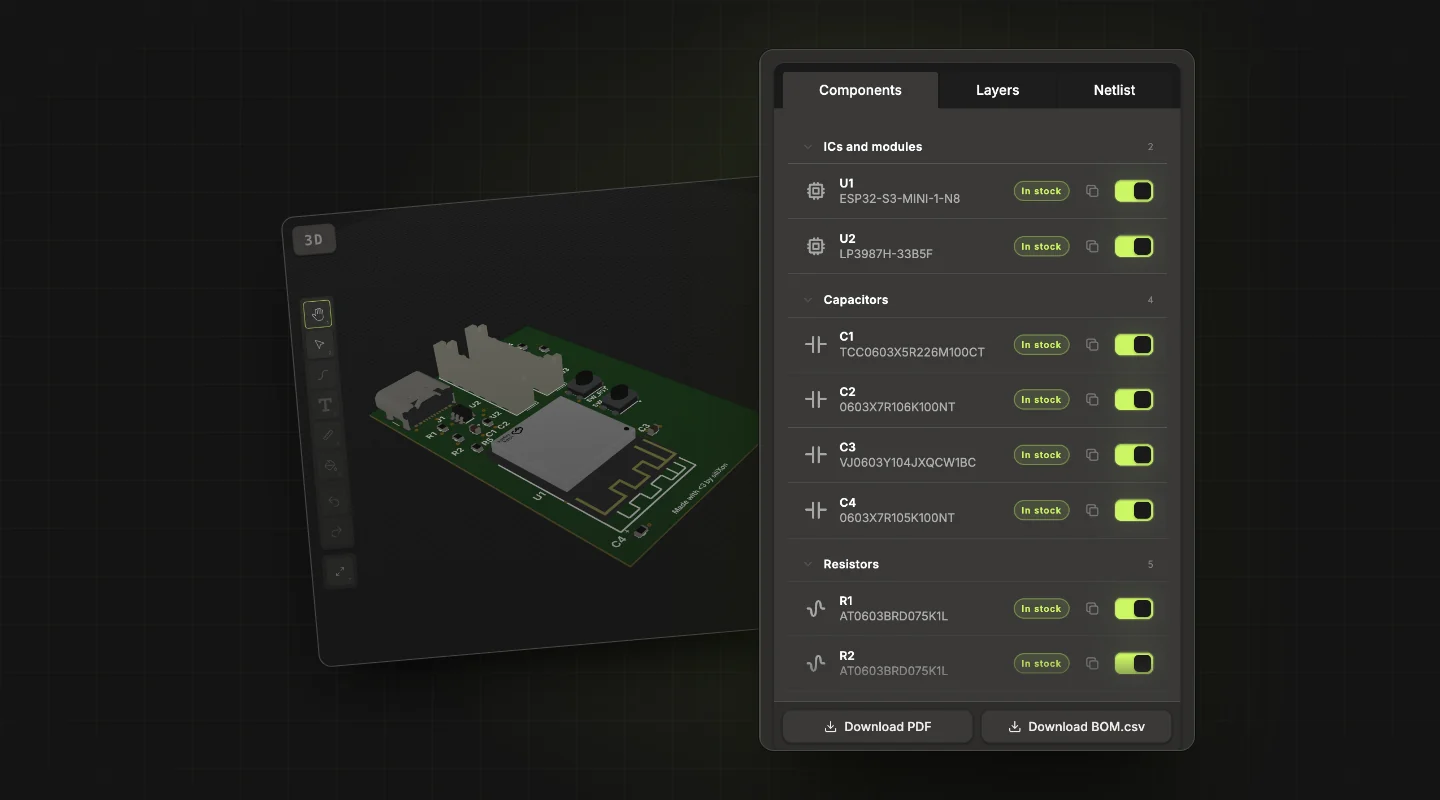
Every part on the board, in stock, with a BOM you can download.
3. Placement is handled
siliXon positions every component on the board: connectors at the edge, the battery holder where it's easy to reach, the LED where you can see it, and small supporting parts next to the chips they serve. You don't drag a single part.
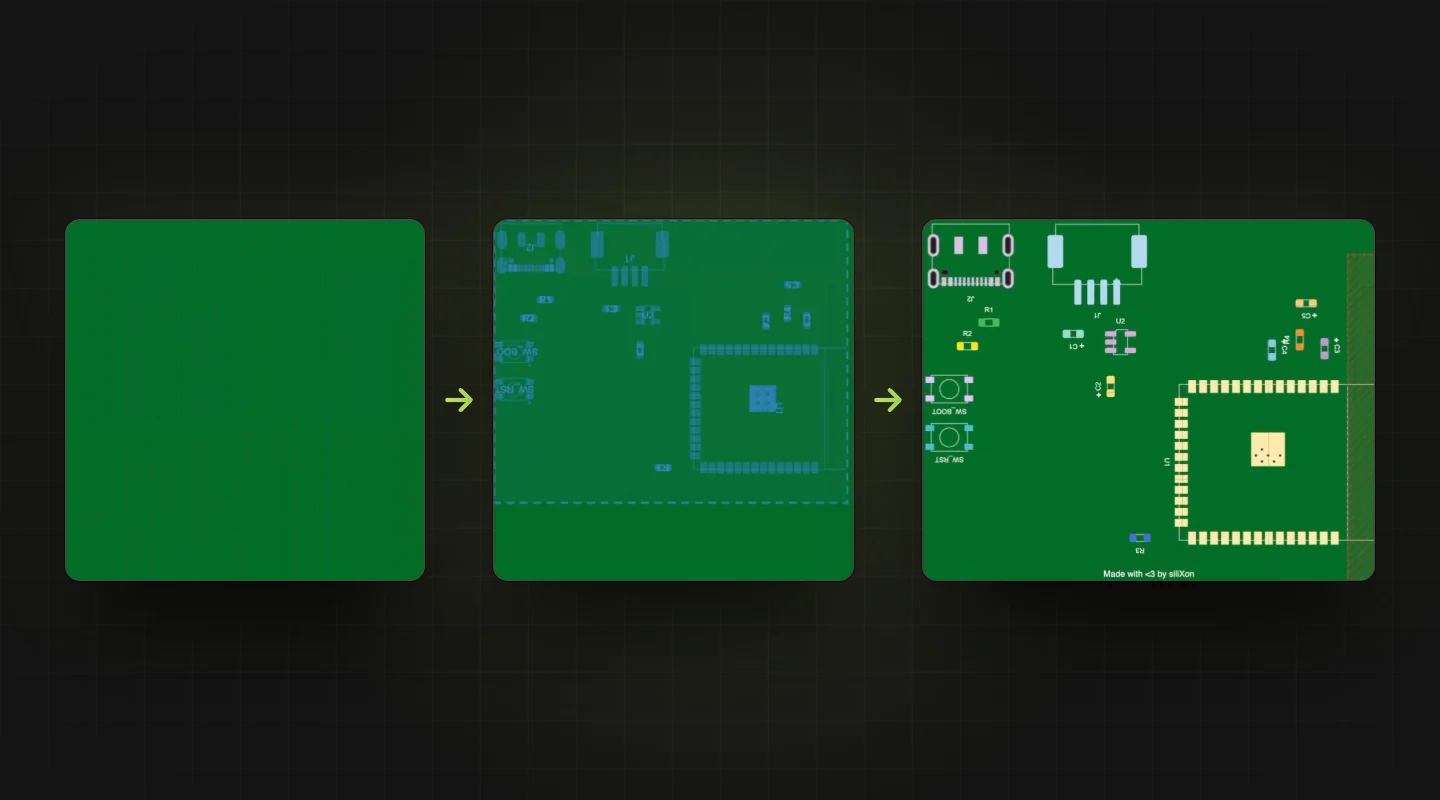
Placement in a real siliXon session, from an empty board to every part in place.
As we are in beta, we are constantly making updates to our placement algorithm and making it more efficient. siliXon provides you with the tools to be able to drag components on a part of the board that is closer to your specifications.
4. Connecting components = easy
siliXon makes sure to connect (route) the copper wires (traces) that connect everything, adding vias where a trace needs to change layers and following the manufacturer's rules for trace width and spacing. By hand, this is the step that takes beginners the longest.
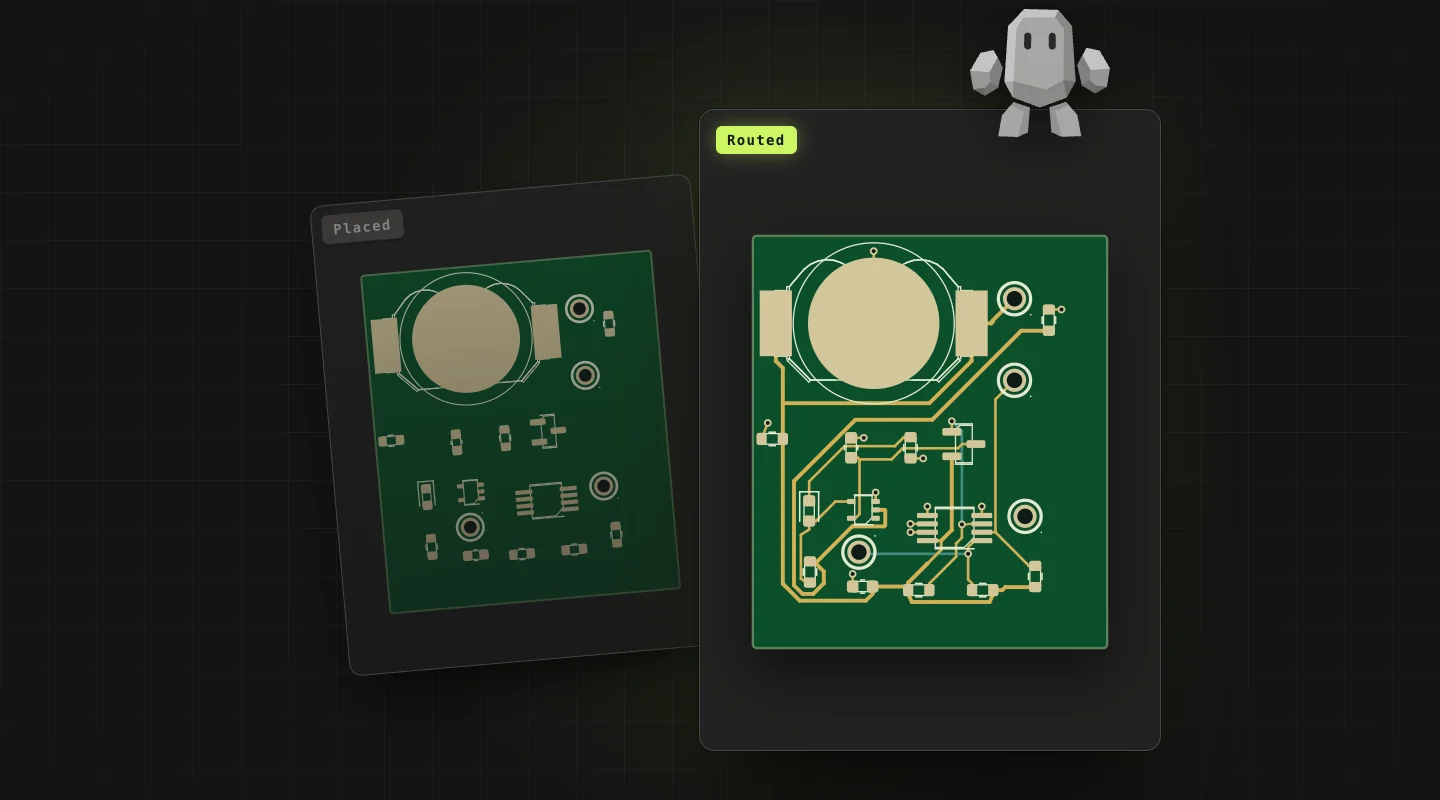
The same board after placement, then after routing.
Connecting components is perhaps the most tedious task in designing an electronic circuit, due to needing to be aware of manufacturing constraints; and worrying about electrical performance - that is limiting noise, crosstalk and making sure trace widths are sufficient for different currents - siliXon handles all of this so you don't have to worry. When routing finished on one of our recorded boards, Rocky simply replied:
I connected 75 traces and placed 15 vias. Your board is all wired up!
5. The checks run, and Rocky fixes what they find
Before a board is ready to order, siliXon runs its manufacturing checks: are the parts and placement sound, is every connection routed, does the copper respect the manufacturer's limits (a design rule check), is the circuit electrically continuous, and do the parts match their datasheets?
If a check finds a problem, you don't need to know how to fix it. One click asks Rocky to repair the board, then the checks run again.
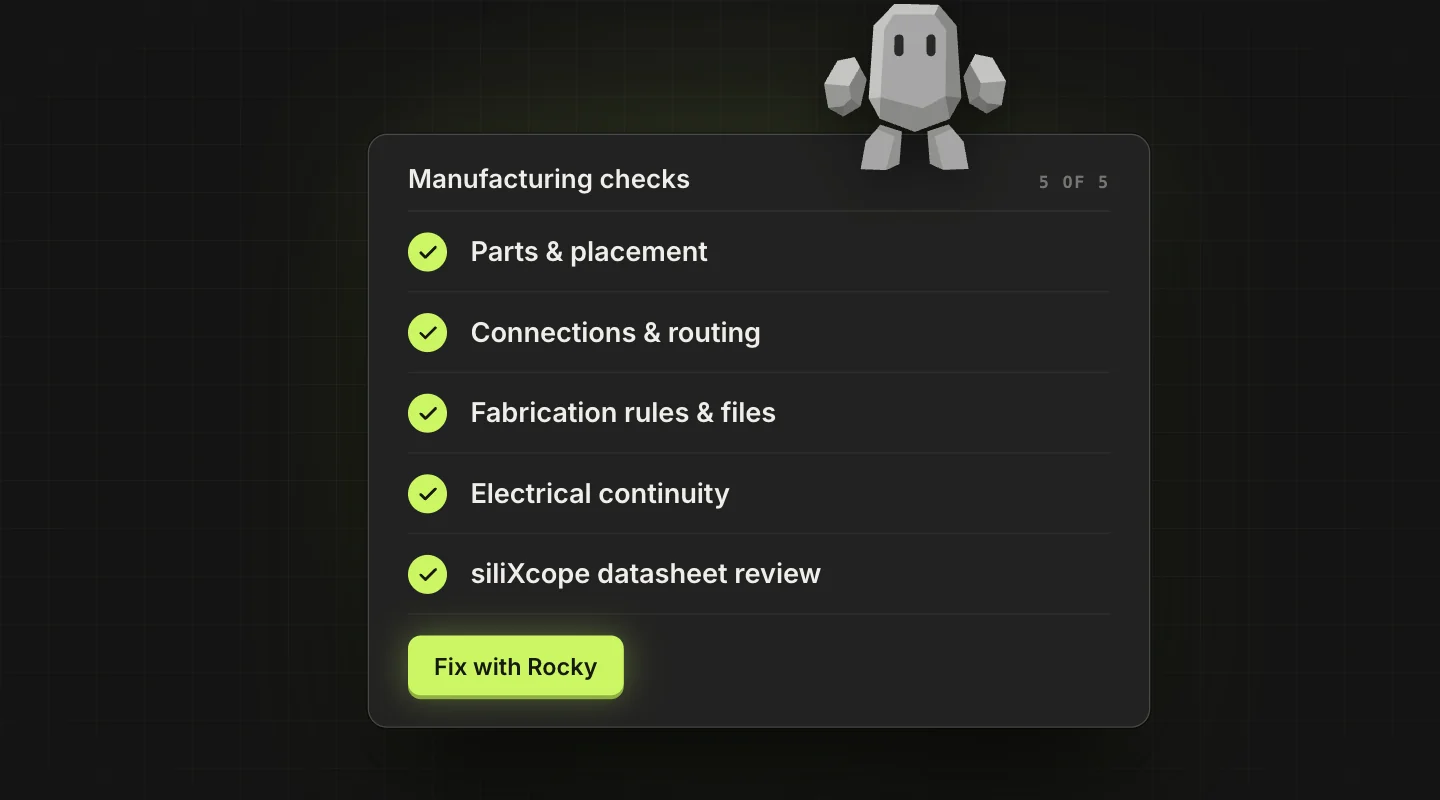
Five checks before every order. Whatever they find, Rocky can fix.
6. Change anything by asking
The board isn't a black box. Open it in 2D or 3D, move parts yourself, or ask for changes in plain English:
- "Make the board smaller."
- "Add an on/off switch."
- "Why is this part here?"
siliXon updates the design and keeps everything you didn't ask to change.
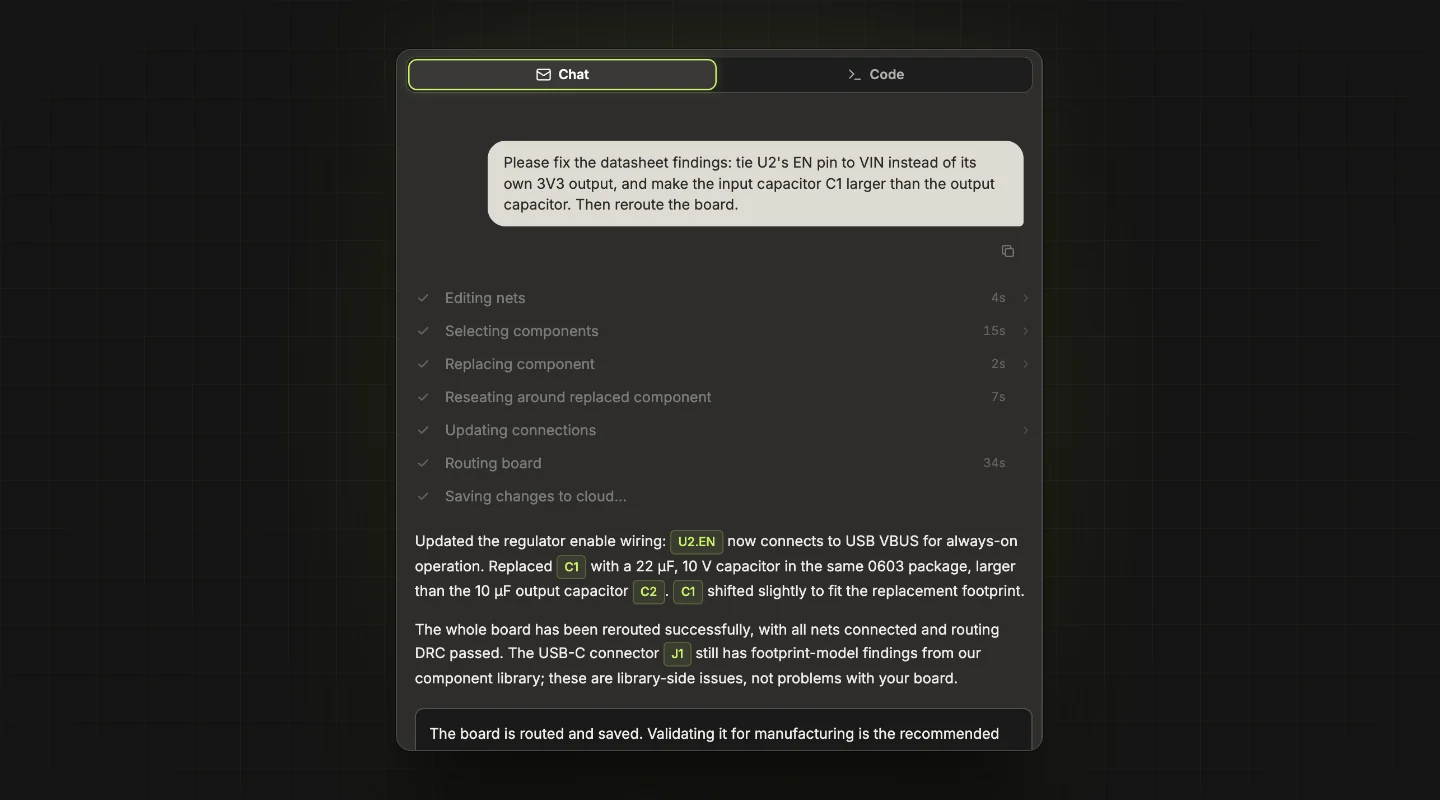
Ask in plain English, then watch Rocky edit and reroute the board.
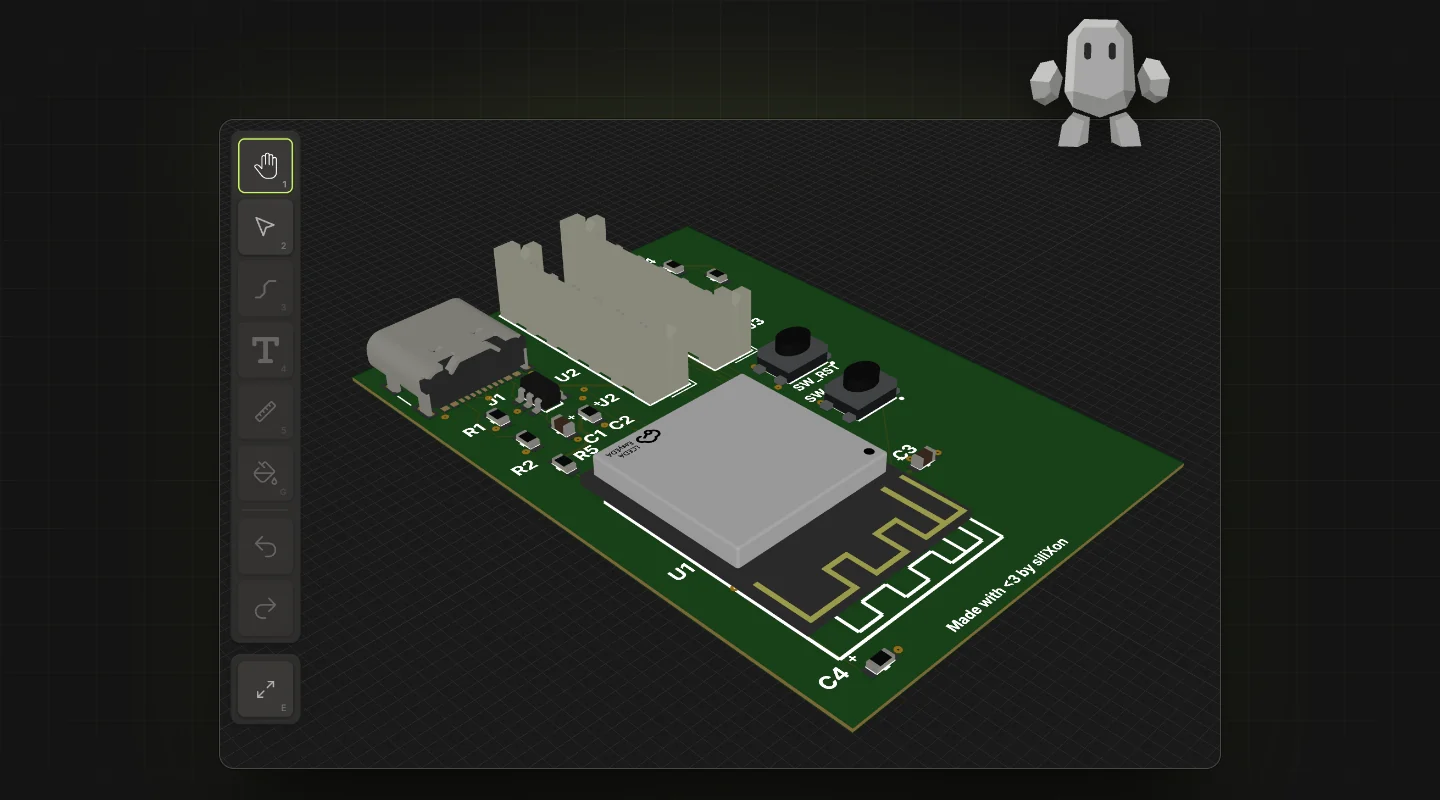
Check connectors, buttons and clearances in 3D before you order.
7. Send it to the manufacturer
When the checks pass, siliXon packs everything a board factory needs into one ZIP: the Gerber files for every layer and the board outline, the drill files and the pick-and-place file. The bill of materials (BOM) downloads alongside as a CSV.
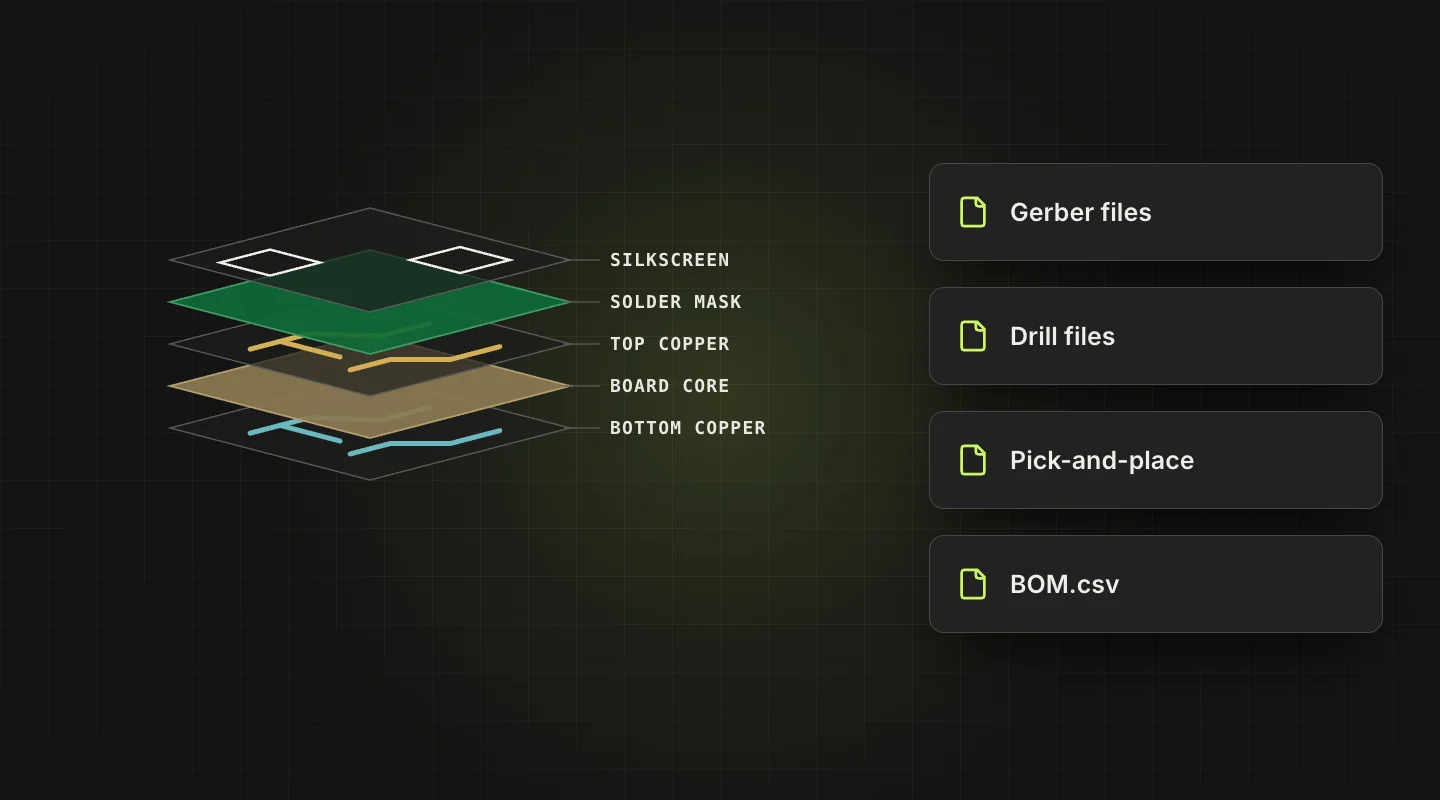
What's inside your manufacturing download.
Where direct ordering is available, you choose the quantity, get a live price and create the order without leaving siliXon. Otherwise, upload the ZIP to a board manufacturer and order there. Small two-layer boards often cost a few dollars for five, before shipping.
8. Hold your board
When the boards arrive, solder the parts (or have the manufacturer assemble them using the BOM and pick-and-place file), insert the battery and watch the LED light up. You designed a PCB. For more complex circuit boards, you will be able to flash the firmware onto your board to give it the functionality it needs; in other words, the brains. siliXon provides firmware to your board on generation; once you have your board, connect it to your computer and flash the code to it!
From a single prompt to a finished board
The LED board is deliberately tiny, but the process is the same for bigger ideas. In one real session, siliXon went from a one-sentence prompt to a complete two-layer Bluetooth drone controller in 9 minutes 52 seconds, including the time spent answering Rocky's questions.
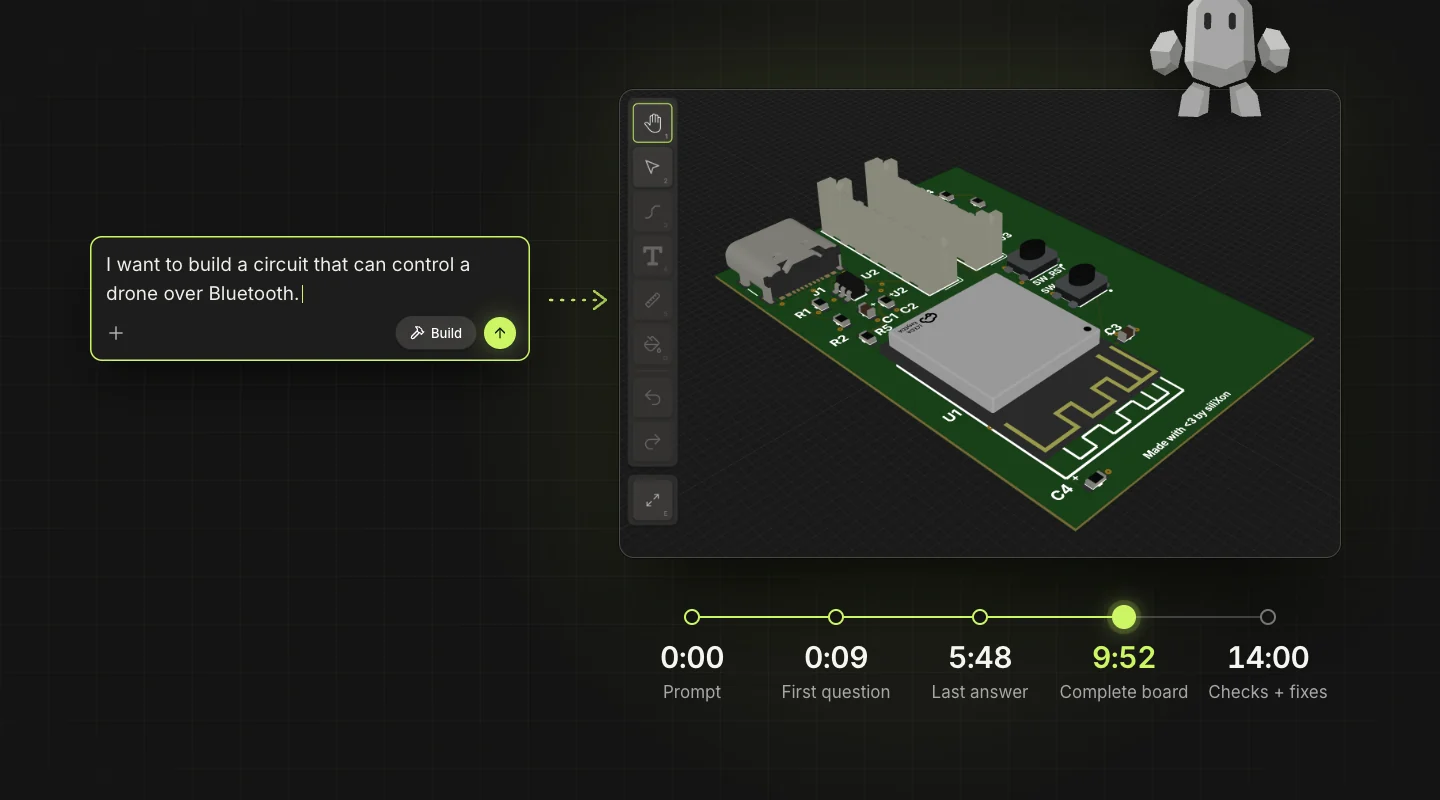
Timed from the session log of a real siliXon project.
Each of these boards was placed and routed by siliXon from a plain-English description:
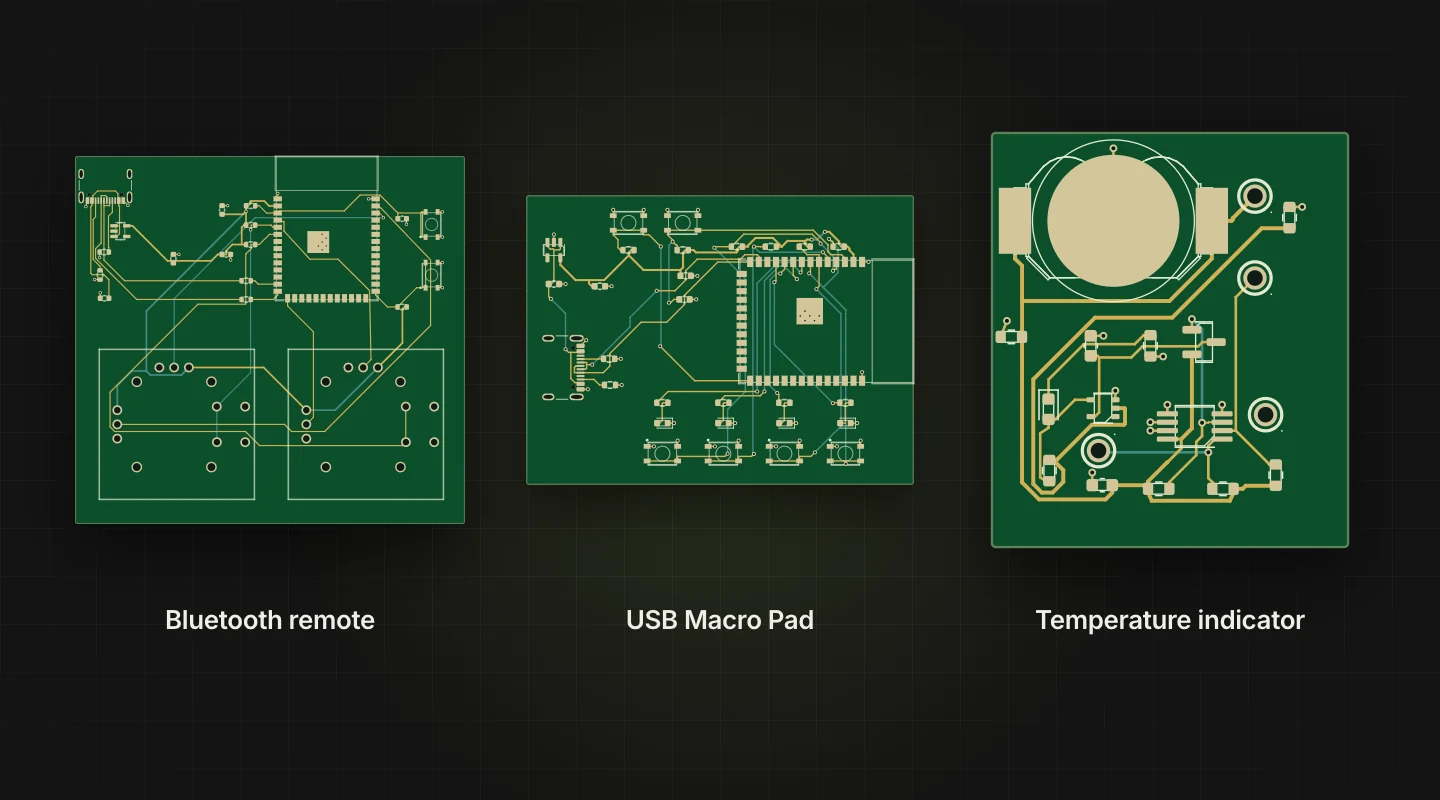
Explore the temperature indicator, Bluetooth remote or USB Macro Pad in your browser.
A simple board takes minutes, not weeks. siliXon is in early beta and builds two- and four-layer boards that are mostly digital. As with any design, review it before you send it for manufacture.
Prompts to try for your first board
Copy one of these into siliXon, or use it as a starting point for your own idea:
- "A small board with a coin-cell holder and a red LED that lights when the battery is in."
- "A USB-C powered night light that turns on an LED when the room gets dark."
- "A coin-cell temperature sensor that blinks an LED when it gets too warm."
- "A macro pad with four buttons and four status LEDs, programmable over USB."
Each one adds a new idea: a battery, a sensor, an alert, then a microcontroller that runs code. For boards with a microcontroller, siliXon includes the steps to program it over USB.
Beginner PCB mistakes siliXon handles for you
These are the mistakes that most often turn a first board into a coaster:
- A footprint that doesn't match the part. siliXon picks real parts and the footprints that belong to them.
- Parts that are out of stock. siliXon chooses parts that are available, so the board can actually be built.
- Missing decoupling capacitors. Chips need a small capacitor next to their power pins. siliXon adds them.
- Unrouted or badly spaced copper. siliXon routes to the manufacturer's rules, and the checks catch anything left over.
- Files the factory rejects. siliXon prepares the full manufacturing set in the formats board manufacturers expect.
That leaves you free to focus on the part that matters: what you want your board to do.
Beginner PCB glossary
For a deeper tour of the layers and terms, SparkFun's PCB Basics is a good next read.
- Trace: a copper track that connects pads.
- Pad: the copper area a component is soldered to.
- Footprint: the pattern of pads for one specific part.
- Placement: positioning each component on the board.
- Routing: drawing the copper traces that connect the components.
- Via: a small plated hole that connects traces on different layers.
- Layer: a sheet of copper. Most beginner boards have two (top and bottom).
- Solder mask: the coloured coating (usually green) that covers copper you don't solder.
- Silkscreen: the printed text and outlines on the board.
- Gerber files: the standard files a manufacturer uses to make your board, one per layer.
- BOM: the bill of materials, a list of every part on the board.
- Pick-and-place file: where each part sits, used by the machines that assemble boards.
Frequently asked questions
Can I design a PCB with no experience?
Yes. With siliXon you describe the board in plain English, and it handles the circuit, parts, placement, routing and checks. A simple first board takes minutes.
Do I need to learn PCB design software first?
No. siliXon runs in your browser and works from a description. There's no schematic to draw and nothing to route by hand, though you can edit the board yourself whenever you want to.
How does siliXon handle placement and routing?
Automatically. After choosing the parts, siliXon places each one on the board and routes the copper traces between them, following the manufacturer's rules. You can move parts afterwards and ask for changes in plain English.
How long does it take to design a PCB with siliXon?
A simple board takes minutes. By hand, even a small first board usually takes a beginner a weekend or more, including learning the tools.
How do I get my board manufactured?
When the checks pass, siliXon prepares the manufacturing files as one ZIP. Where direct ordering is available you can price and order the board from inside siliXon; otherwise you upload the ZIP to a board manufacturer.
How much does it cost to make a PCB?
For a small two-layer board, low-cost manufacturers often charge a few dollars for five boards, plus shipping. Assembly, extra layers and fast shipping add to the price.
Do I need to know how to solder?
It helps, but it isn't required. Many manufacturers can assemble the board for you using the BOM and pick-and-place file siliXon provides.
Can I import a KiCad design?
Yes. If you already have a board in KiCad, you can bring it into siliXon and keep working on it in plain English. Our siliXon vs KiCad comparison covers when each one fits best.
What kinds of boards can siliXon design?
siliXon is in early beta. It builds two- and four-layer boards that are mostly digital, such as LED projects, sensors, USB devices and microcontroller boards.
Start your first board
The best way to learn electronics is to finish a board and hold it in your hands. You don't need to master PCB software first. Describe your first board to siliXon and watch it go from a sentence to a board you can order.
Sources and further reading
- Printed circuit board, Via, Crosstalk and Bill of materials, Wikipedia.
- Ohm's law, Wikipedia: V = I × R.
- Light-emitting diode, Wikipedia: red LEDs drop about 1.6 to 2.0 V.
- Decoupling capacitor, Wikipedia: about 100 nF placed close to each chip.
- Energizer CR2032 datasheet: 3.0 V nominal, 235 mAh typical capacity.
- Light-Emitting Diodes (LEDs) and PCB Basics, SparkFun Learn.
- The Gerber format, Ucamco, the format's official home.
- IPC-2152, IPC's standard for sizing traces to the current they carry.
- KiCad documentation: Getting Started in KiCad (design rule checks and fabrication outputs), the PCB Editor manual (footprints, drill files and component placement files) and the PCB Calculator (track width from IPC-2221).
- From siliXon: why PCB design takes so long, a brief history of PCBs and Rocky v1.5.